Understanding how to effectively remove window tint is critical, especially if you’re considering a DIY approach. Many homeowners are intimidated by the prospect of removing window tint, fearing damage to the glass or a long, tedious process. However, with careful preparation and execution, you can achieve professional results. By learning the proper methods, you can save money on professional removal services and gain the satisfaction of completing a home improvement project on your own.
Window tint film is a thin laminate that is applied to the interior or exterior of glass surfaces. It’s used for various reasons, including reducing heat, glare, and UV radiation, as well as improving privacy and security. Over time, however, window tint can fade, bubble, or peel, making it less effective and less attractive. This degradation can be accelerated by factors such as prolonged exposure to sunlight, temperature fluctuations, and poor installation techniques. As the tint deteriorates, it can become a visual distraction and a source of frustration.
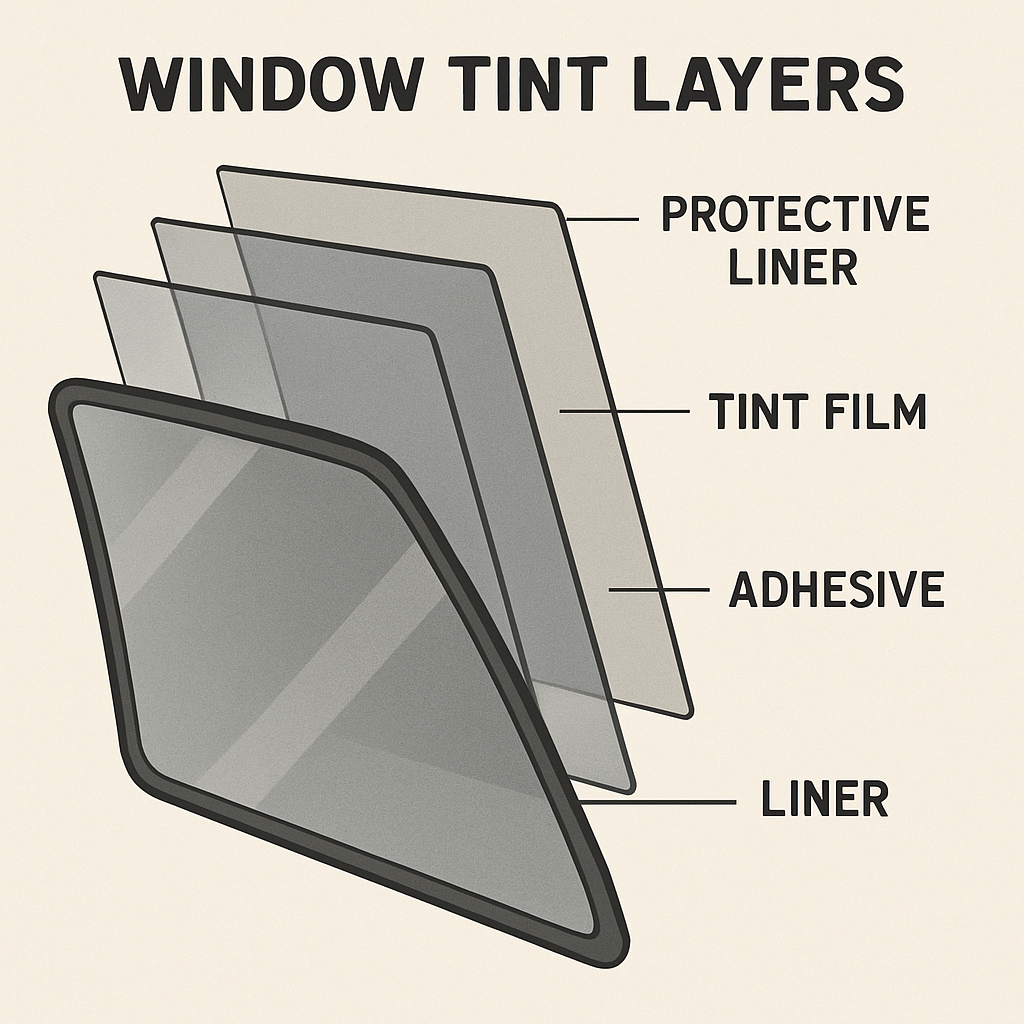
Understanding the composition of window tint is important when considering its removal. The film typically consists of several layers, each serving a specific purpose, such as blocking UV rays or providing additional strength to the glass. Knowing this can help you anticipate the challenges you might face during removal. For instance, older films may have more stubborn adhesives that require extra effort to remove. By understanding these elements, you can better prepare for the task at hand.
Why Remove Old Window Tint?
Old window tint can detract from the appearance of your home and hinder the performance of your windows. Here are a few reasons why you might want to remove it:
- Improved Appearance: Removing old, bubbled, or faded tint can significantly enhance the look of your windows. Clear, untinted windows can give your home a cleaner and more modern appearance. Additionally, removing damaged tint allows for more natural light to enter, brightening your interiors and creating a more inviting atmosphere.
- Better Energy Efficiency: Newer window tints often offer better UV protection and insulation properties. By removing old tint and replacing it with modern alternatives, you can reduce your energy bills by improving your home’s ability to regulate indoor temperatures. This upgrade can contribute to a more sustainable lifestyle by minimizing your carbon footprint.
- Enhanced Visibility: Over time, tint can become cloudy, obstructing your view and reducing natural light. Clear windows allow for unobstructed views of the outdoors, which can enhance your mood and overall well-being. This clarity can also improve safety by providing a better view of your surroundings, whether you’re at home or on the road.
Preparing for Window Tint Removal
Before you start the removal process, it’s important to gather the necessary tools and prepare your workspace. Proper preparation ensures that the removal process goes smoothly and reduces the risk of damage to your windows or surrounding areas.
Tools You Will Need
To remove window tint film safely and effectively, you’ll need the following items:
- A utility knife or razor blade: This tool will help you lift the edges of the tint, making it easier to peel away. Ensure the blade is sharp to avoid scratching the glass.
- Soapy water in a spray bottle: A simple mixture of soap and water acts as a lubricant, making it easier to remove the adhesive residue. It also helps to keep the glass clean during the process.
- A hairdryer or heat gun: Heat is crucial in softening the adhesive, facilitating easier tint removal. A hairdryer is ideal for small projects, while a heat gun can be more effective for larger or more stubborn jobs.
- A plastic scraper: This tool is essential for removing residual adhesive without scratching the glass. Opt for a scraper with a comfortable grip to prevent hand fatigue during use.
- Clean, dry towels: These are necessary for wiping down the windows after removing the tint and adhesive.
- Window cleaner: After removing the tint and adhesive, a good window cleaner will ensure your glass is left spotless and streak-free.
Safety Precautions

While removing window tint is generally safe, there are a few precautions to keep in mind to protect yourself and your surroundings:
- Wear Safety Goggles: Protect your eyes from any flying debris that might occur when peeling or scraping the tint. This is especially important if you’re using a razor blade or utility knife, as small particles or adhesive pieces can become airborne.
- Use Gloves: This will prevent cuts from sharp tools and protect your hands from adhesive chemicals. Gloves can also provide a better grip on tools, reducing the likelihood of accidents.
- Ensure Proper Ventilation: If you’re working with any chemicals, make sure the area is well-ventilated. Open windows and doors, or use fans to disperse fumes, ensuring you don’t inhale any potentially harmful substances.
Step-by-Step Guide to Removing Window Tint
Now that you’re prepared, let’s walk through the steps to remove old window tint film. Following these steps carefully will help you achieve the best results.
Step 1: Soften the Adhesive
The first step in removing window tint is to soften the adhesive that holds the tint film in place. You can do this by applying heat.
- Use a Hairdryer or Heat Gun: Hold it about 2-4 inches away from the tint and move it back and forth to evenly heat the film. This will soften the adhesive, making it easier to peel off. Ensure you don’t overheat any single spot to avoid damaging the glass or the surrounding frame.
Applying heat evenly ensures that the adhesive loosens uniformly, reducing the risk of tearing the tint during removal. If using a heat gun, start on a lower setting to avoid overheating and gradually increase the temperature as needed. The goal is to warm the adhesive just enough to make it pliable without causing damage to the glass or the tint.
Step 2: Start Peeling the Tint
Once the adhesive is warm, you can begin to peel the tint off. This step requires patience and a gentle touch to avoid tearing the tint or scratching the glass.
- Lift a Corner: Use your utility knife or razor blade to lift a corner of the tint film gently. Once you have a good grip, you can begin the peeling process. Be careful not to gouge the glass with the blade.
- Slowly Peel the Tint: Pull the film away from the glass slowly to avoid tearing. If the tint resists, apply more heat. A steady, gentle pull is often more effective than a quick yank, which can result in the film tearing into smaller, harder-to-manage pieces.
Peeling the tint slowly allows you to monitor the glass for any signs of damage and adjust your technique as needed. If the tint begins to tear or leave behind large amounts of adhesive, pause and reapply heat to loosen the remaining sections.
Step 3: Remove Any Remaining Adhesive
After the film is removed, there will likely be adhesive residue left on the glass. Removing this residue is crucial for achieving a clear, streak-free finish.
- Spray Soapy Water: Liberally spray the soapy water onto the adhesive. This will help break down the adhesive, making it easier to scrape off. The soap acts as a lubricant, reducing friction and the risk of scratching the glass.
- Scrape the Adhesive: Use a plastic scraper to gently remove the adhesive. Be careful not to scratch the glass. Working in small sections can make the task more manageable and ensure all residue is thoroughly removed.
Repeated applications of soapy water may be necessary for stubborn adhesive. Take your time and ensure all residue is cleared, as any leftover adhesive can interfere with new tint application or cleaning.
Step 4: Clean the Glass
Once all the adhesive is removed, it’s important to clean the glass thoroughly to ensure a pristine finish.
- Spray Window Cleaner: Apply window cleaner to the glass. This will help remove any remaining soap or adhesive residue and leave the glass sparkling clean.
- Wipe with a Towel: Use a clean towel to wipe the glass, ensuring it’s clear and streak-free. A microfiber cloth is ideal for this step as it minimizes streaks and lint left on the glass.
A thorough cleaning is essential for both aesthetic and practical reasons. Not only does it enhance the appearance of your windows, but it also prepares the surface for any future treatments or tint applications.
Alternative Methods for Tint Removal
For those who prefer not to use heat, there are other methods you can try. These alternatives can be just as effective and may better suit your preferences or the specific conditions of your project.
Ammonia and Sun Method
This method uses ammonia to break down the adhesive:
- Spray Ammonia: Apply ammonia to the window tint and cover with a plastic trash bag to trap the fumes. This creates a mini greenhouse effect, allowing the ammonia to penetrate and soften the adhesive effectively.
- Leave in the Sun: Allow the window to sit in the sun for a few hours. The ammonia will soften the adhesive. The sun’s heat enhances the chemical reaction, making the adhesive easier to remove.
- Peel and Clean: Follow the same peeling and cleaning process as above. This method may require multiple applications, especially for thicker or older tints.
The ammonia and sun method is particularly useful in warm climates where sunlight is abundant. It provides a chemical-free alternative to heat guns, reducing the risk of damage to the window’s surface.
Steam Method
A steam cleaner can also be effective:
- Steam the Tint: Use the steam cleaner to apply steam to the tint, loosening the adhesive. Steam penetrates the layers of tint and adhesive, making them easier to separate from the glass.
- Peel the Tint: Once softened, peel the tint away. The steam method is gentle on the glass and can be more comfortable to use for extended periods.
- Clean the Glass: Remove any remaining adhesive and clean the glass. This method is often less messy than others and can be easier on sensitive skin or respiratory systems.
Using steam is a great option for those who want to avoid chemical exposure. It provides a consistent level of heat that can be controlled easily, making it an appealing choice for many DIY enthusiasts.
Tips for Success
Achieving a clean, professional result when removing window tint requires patience and attention to detail. Here are some additional tips to help you succeed:
- Test First: Before starting, test your method on a small area to ensure it won’t damage the glass. This is especially important if you’re using heat or chemicals, as some glass types may react differently.
- Be Patient: Removing tint can be time-consuming, especially if it’s old or stubborn. Rushing the process can lead to mistakes and potential damage, so take your time and proceed methodically.
- Seek Professional Help: If you’re unsure or uncomfortable doing it yourself, consider hiring a professional. They have the experience and tools to remove tint quickly and safely, ensuring the best possible outcome.
A successful tint removal project can enhance your home’s appearance and functionality. By following these tips and techniques, you can achieve the desired results with minimal hassle and cost.
Conclusion

by Joel Filipe (https://unsplash.com/@joelfilip)
Removing old window tint film can breathe new life into your windows, improve energy efficiency, and enhance your home’s appearance. By following these safe and easy methods, you can achieve professional results without the cost. Remember, patience and the right tools are key to a successful DIY tint removal project. If you encounter any issues, don’t hesitate to consult with a window tint professional to ensure the best outcome for your home.
With your windows refreshed, you’ll enjoy clearer views and a more comfortable living environment. Whether you’re an interior designer looking to enhance your client’s spaces or a homeowner seeking DIY solutions, these tips will guide you to success. By investing time and effort into maintaining your windows, you not only enhance your home’s aesthetic appeal but also contribute to its overall value and efficiency.
::contentReference[oaicite:0]{index=0}